Saturday, October 30, 2010

Adventures in Baking 101: Custards


Baking class, week ten. I keep talking about how much I love this class. Despite the occasional failure (like those cupcakes from a few weeks ago), who wouldn’t love all the scrumptious desserts we turn out each week? I know my family appreciate it. But as much as I love it, I usually have a twinge of nervousness before class.


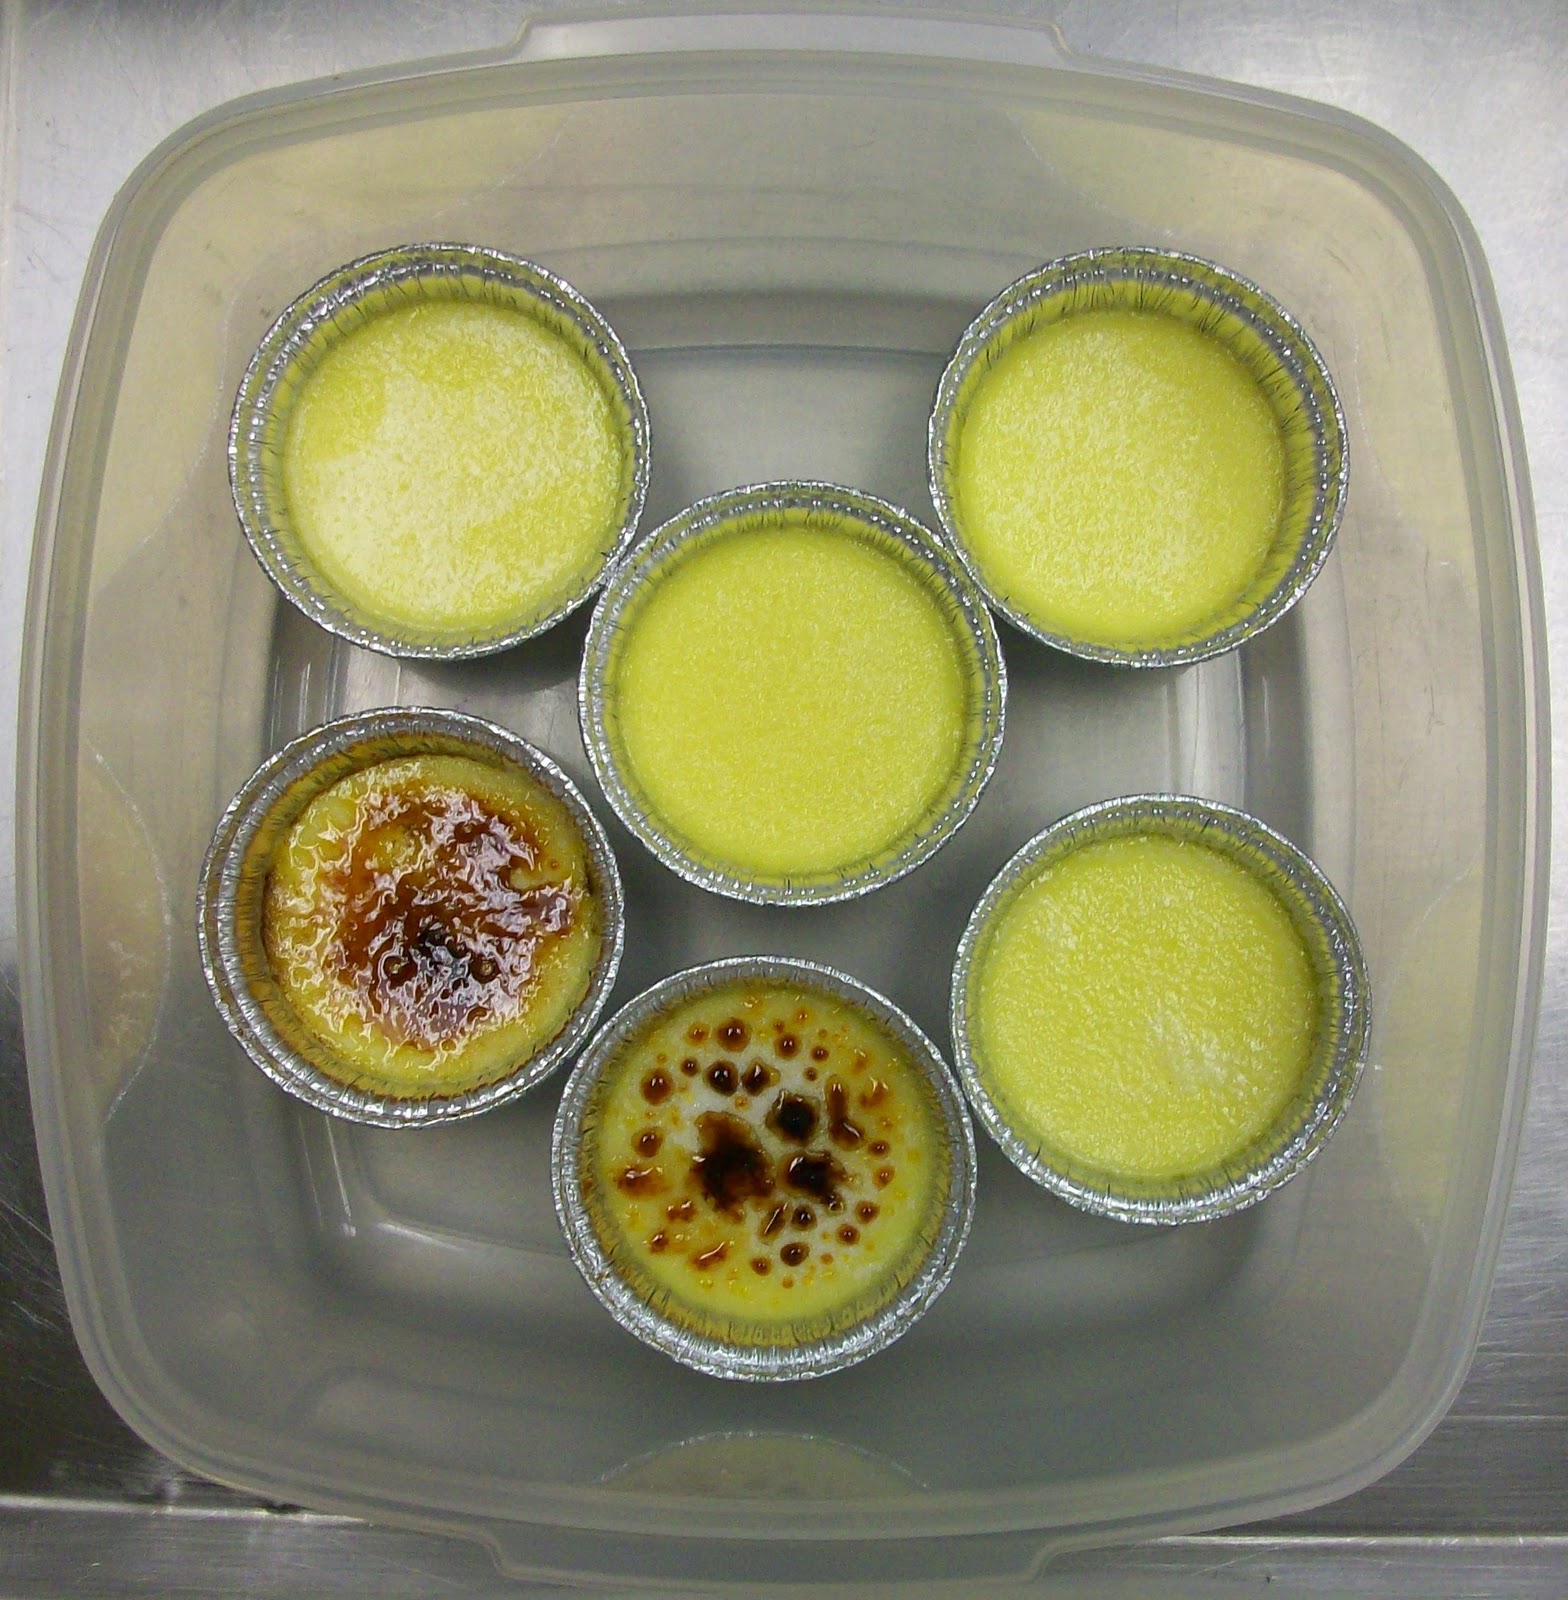
Ramekins of crême brûlée, without the sugar caramelized on top.
The one in the foreground is overbaked.


One reason for the nerves is that baking class is not a normal lecture-style class in which you slouch in a chair and listen to someone talk for an hour. It’s active and 90% hands-on. Each class is sort of a performance where you’re trying to work quickly and come out with the best product you can in the shortest amount of time. It’s easy to see why there are so many competitive cooking shows on Food Network; by nature, professional cooking is fast-paced and somewhat competitive, even if the competition is simply to serve 200 diners during a two-hour lunch rush.

Also the class is five hours long, running from 4:00–9:00 p.m. one day a week. That’s a long class, and because there’s so much to do it’s usually without a break. (The smokers manage to take ten minutes off.) It’s like plugging yourself in to an electrical socket and not unplugging for five hours. I love the class, but it’s definitely something I have to get psyched for.

Today we focus on custards, which are basically liquids thickened with eggs. Their consistency depends on the ratio of eggs to liquid: the more eggs in proportion to liquid, the thicker and richer the custard. Most of the custards Americans know and love are based on milk or cream, sugar, eggs, and vanilla, though there are many variations.

Custards fall into two categories: stirred and baked. Stirred custards include things like pastry cream and lemon curd, which we’re making in today’s class. Pastry cream is a classic custard—thick, smooth, and milky—and is used to fill pastries such as éclairs. Lemon curd is slightly sweet with the sharp flavor of fresh lemon juice instead of milk. As you might guess it’s used as a filling for lemon cream pie, and for those small lemon tarts the British like so much. Pudding is another type of stirred custard, as is sabayon, which is made with wine instead of milk.

Caramelizing sugar on crème brûlée is trickier than you might think.
The bottom center one had too much sugar on top and did not
caramelize properly. We used a propane torch for the caramelization.
Crème brûlée is a type of baked custard, and I’m very happy to be making a batch in this week’s class because it’s one of my favorite desserts. Flan and crème caramel, which are essentially the same dessert, are other examples. Surprisingly (at least to me), cheesecake is considered a baked custard. The filling for cheesecake is mostly a mixture of milk or cream, sugar, and eggs, so in terms of ingredients it falls neatly into the custard family. The addition of cream cheese makes the texture a little firmer, but soft cheesecake fillings can be very custardy indeed.

During the lecture portion of class, one of the things we’re warned about is not to make lemon curd, or anything acidic, in aluminum cookware. The aluminum will react with the acid in the lemon juice and change the color of the curd from yellow to green. I already knew this and didn’t think much about it at the time. Well, I should have listened more intently.

The green lemon curd. The French refer to this color as "goose shit" green.
The baking students are in a pinch any time we make things requiring a stovetop. For some reason there are no stoves in the baking classroom, only two small induction burners, each of which handles one pan at a time. These two burners and pans need to be shared among six or seven baking teams.

Not wanting to wait for an induction burner, I opt to make our lemon curd in the adjoining classroom, in which a cooking class is in session. The classroom is stocked with a full complement of industrial-strength gas stoves and cookware, and the chef and students are gracious about sharing the space. Unfortunately, the only pans they have are made of aluminum. I don’t realize this until I look down at our freshly-prepared lemon curd, which is pea-green (ugh!).

Now THIS is lemon curd, with a proper yellow color.
Chef Sandy, the baking chef, is happy about our error because it gives her a chance to show the class what NOT to do. She immediately takes the bowl of green curd around to show everyone in class. Understandably my partner Ned and I are less excited, and though the aluminized curd is edible, I do not want to eat green lemon tarts next week. I quickly gather ingredients and set about making a second batch. About twenty minutes later I have a lovely deep-yellow lemon curd, buttery and sweet without a hint of aluminum flavor. Good class!

Take home: six pâte à choux filled with vanilla pastry cream, six small ramekins of crème brûlée.

Tuesday, October 26, 2010

Adventures in Baking 101: Pie Dough, Tart Dough, Pâte à Choux


Baking class, week nine. This week we focus on pie and tart doughs. Unfortunately we’re only preparing the doughs and won’t be filling them for two weeks, so no pie to show or take home :(. At the end of class we’ll be introduced to an unusual dough called pâte à choux, used for éclairs and similar pastries.

Baked rounds of pâte à choux, to be filled with pastry cream next week.
I'm learning a lot in this class. Pie dough, known as pâte brisée in the pastry world, can be flaky or mealy. Flaky dough delivers the classic American pie crust, with tender layers of pastry. Mealy dough results in a crust that is denser and less flaky but resists sogginess better, making it a good choice for custard or cream pies.

Both doughs begin by cutting cold, solid fat (butter, lard or shortening) into flour. The different textures are achieved by the final size of the fat particles. For flaky dough the fat is left in pieces about the size of a pea. For mealy dough the fat is cut more finely, to the consistency of coarse cornmeal, making a denser dough that resists moisture better. Voilá!

Ingredients for the pie and tart doughs, waiting for a mixer to become available.
Tart dough, or pâte sucrée, is sweeter and richer than pie dough, and bakes into a crisp, cookielike crust. Shortbread tart dough (pâte sablée) has more fat and results in a rich, crumbly crust. This week we prepare two doughs–a flaky pie dough and a mealy tart dough–but the taste test will have to wait for two weeks, when we'll prepare the fillings.

Pâte à choux dough is unusual because it is cooked before baking. Milk, water, salt, and butter are brought to a boil in a saucepan, then flour is added. The mixture is vigorously stirred for several minutes until it dries somewhat and resembles mashed potatoes. It’s then transferred to a mixer, and eggs are gradually beaten into the dough until it’s shiny, at which point it’s ready to shape and bake.

Pâte à choux bakes into a light, delicate pastry that is mostly air inside, making it perfect for filling with custard, whipped cream, or fruit purée. The dough can be piped into rounds for cream puffs or profiteroles, or into long fingers for éclairs. It can also be deep-fried, and is the basis for beignets (the New Orleans specialty) and the Mexican doughnuts known as churros.

For our exercise we fill pastry bags with pâte à choux and pipe it into rounds, which puff up into crisp little spheres. They're not sweet but have a rich, buttery flavor, like popovers. The plan is to fill the baked spheres with pastry cream (sort of a creamy custard) next week, so they go into the freezer until then. (Freezing is an oft-used technique in baking; cakes, pastry, cookies, and doughs all freeze well with minimal sacrifice of flavor or texture.)

Take home: sixteen extra large brownies (baked last week); balls of baked pâte à choux for freezing at home.
 

Monday, October 25, 2010

Adventures in Baking 101: Cherry Almond Pinwheels


In the last baking class we were given a homework assignment: choose a cookie recipe, change at least two things about the recipe (either ingredients or method of preparation), and bring thirteen cookies to the next class for critique and discussion. The cookies were to be evaluated on overall appearance, taste, and modifications.

I chose to modify a recipe called Fig Pinwheels that I found in a Martha Stewart holiday cookie periodical from 2005. The cookies are spirals of buttery dough with a figgy filling, and look like small cinnamon rolls. They have a dramatic appearance that I thought would make a good impression.


The filling for the original cookies called for dried figs, golden raisins, apple juice, and orange juice. I substituted dried cherries for the figs and–to kick up the cherry flavor–pure cherry juice for the orange juice. The other significant modification was adding almond extract to the dough.

The modified recipe is below. For those intrepid souls who are contemplating making these, I'll warn you that if the dough warms up it becomes very sticky and almost impossible to work with, so it needs to be kept COLD. You can always put it back in the freezer for a few minutes if necessary. Rolling the dough into a log is tricky and it was only with the second batch that I was able to accomplish it to my satisfaction. Also the dough requires at least 2 1/2 hours freezing time in three stages, so these are not quick to prepare.

Looking back it was a bit crazy to choose this recipe for the homework assignment, but I learned a lot and have no regrets! The family and I were pleased with the outcome, and the cookies were well-received in baking class too.


Cherry Almond Pinwheels

For the dough:
2 1/2 c. all purpose flour, plus more for dusting
1 t. coarse salt
1/2 t. baking soda
1 c. unsalted butter, softened
1/2 c. granulated sugar
1/2 c. packed light brown sugar
2 large eggs
1 1/2 t. almond extract

For the filling:
1 1/8 c. dried cherries
2/3 c. golden raisins
2/3 c. apple juice
2/3 c. pure cherry juice
  1. Make dough: Sift together flour, salt, and baking soda into a large bowl; set aside. Put butter and sugars in the bowl of an electric mixer fitted with the paddle attachment. Mix on medium speed until smooth, about 3 minutes. Mix in eggs and almond extract. Reduce speed to low; gradually mix in flour mixture. Divide dough in half; wrap each half in plastic. Freeze until firm, about 1 hour or overnight.
  2. Transfer one of the dough halves to a lightly floured piece of parchment paper. Roll out to a 10-by-12-inch rectangle; trim edges with a knife. Repeat with remaining dough half. Transfer each rectangle on parchment to a baking sheet. Freeze 30 minutes.
  3. Make filling: Bring cherries, raisins, and juices to a simmer in a medium saucepan over medium-high heat. Reduce heat to medium. Cook, stirring often, until fruit has softened and only a few tablespoons of liquid remain, about 25 minutes. Let cool completely. Transfer mixture to a food processor, and purée until smooth.
  4. Spread half the filling over each rectangle. Starting with a short side, roll dough into a log. Wrap each log in plastic; freeze until very firm, about 1 hour or overnight.
  5. Preheat oven to 350 degrees F. Cut logs into 1/4-inch-thick slices using a sharp knife, transferring to baking sheets lined with parchment paper (and reshaping into rounds, if needed) as you work. Bake cookies, rotating sheets halfway through, until edges turn golden brown, 12-15 minutes. Let cool on sheets on wire racks. Cookies can be stored between layers of parchment in airtight containers at room temperature up to 3 days.

Saturday, October 23, 2010

Adventures in Baking 101: Cookies and Brownies


Baking class, week eight. Half way through the semester! This week we’re delving into the delicious, magical realm of cookies. We’ll also be making brownies, which are sort of a cake and sort of a cookie. I think they fall a bit more on the cookie side because they’re easy and quick to make. Either way I see good eating ahead.

The finished chocolate chip cookies. These were GOOD.
Did you know? There are eight different types of cookies:
  • Drop cookies are spooned into mounds on a cookie sheet before baking (e.g. chocolate chip or oatmeal cookies).
  • The dough for icebox cookies is shaped into a log, chilled, then sliced into individual pieces before baking.
  • Bar cookies are rolled into a log, baked, then sliced. This category includes biscotti, which are baked a second time after slicing to make each cookie extra crisp.
  • Sheet cookies are pressed or poured into a shallow pan before baking, then cut. Brownies and lemon bars are examples.
  • For cut-out cookies the dough is rolled out, then cut into shapes before baking. This category includes holiday favorites like sugar cookies and gingerbread cookies.
  • Pressed cookies, also known as spritz cookies, are made from a soft dough that is piped through a pastry tip or cookie press (into star shapes, for example).
  • Rolled cookies are made from a firm dough that is rolled out, often spread with a filling, then cut and shaped into crescents, spirals, or other shapes. Rugelach are an example.
  • Wafer cookies are very thin and delicate, made from a base of whipped eggs rather than creamed fat like most of the other cookies. They’re usually crisp. Sometimes wafer cookies are rolled into tubes when still warm. Tuile cookies and pirolines are examples.

Weeks like this make me glad I got into this class. I love the science associated with baking and there’s plenty to learn about cookies. We discuss factors that make cookies crisp or soft, chewy or brittle, pale or dark, spread more or spread less.

Like almost all baked products, cookies stale most quickly at 40 degrees F., which is the temperature at which your refrigerator is set (or should be set, to retard the growth of bacteria). So cookies are best stored at room temperature in an airtight container; they should stay reasonably fresh for about a week. Cookie dough and undecorated baked cookies freeze well if wrapped tightly.

The plan is that each team of two students will make two batches of chocolate chip cookies. The first batch will use melted butter, the second will use butter softened at room temperature. It’s a nifty little experiment to illustrate how the treatment of butter affects the texture of finished cookies. Unfortunately the mise en place crew discover that there isn’t enough butter in the walk-in refrigerator to make fourteen batches of cookies plus seven batches of brownies. So the class is divided into two groups, one of which will use melted butter and the other softened.

My partner Chris and I are on point to use softened butter. The recipe is not difficult and our cookies turn out spectacularly. Bloomington folks may remember a long-standing downtown establishment called Red Chair Bakery that had terrific cookies, and our cookies remind me of those. They’re large–five or six inches across–sweet and substantial. Very satisfying.

Next up is a batch of fudge brownies; again, not difficult to prepare.

Half-sheet of fudge brownies.
It’s decided that we’ll freeze the brownies and discuss them at next week’s class. For some reason the designers of the cooking facility have installed only two small freezers, which are always completely crammed, so there’s not enough room to freeze seven pans of brownies. We have the option to refrigerate the brownies for a week, by which time they will be stale, or take them home and freeze them. Since I definitely want to eat my share of brownies, I opt for the latter. The catch is that I’ve got to remember to bring them back to the next class or Chris and I get zero points for the exercise.

After everything’s out of the ovens and cooled, the class does a quick comparison of the cookie batches. It’s generally decided that the cookies made with softened butter have a better texture than those made with melted butter. Note to self.

Take home: nine large chocolate chip cookies, one sheet pan of fudge brownies (for freezing).

Friday, October 8, 2010

Adventures in Baking 101: Icing Cakes


Baking class, week seven. This week we’ll be making icings for the two cakes we made last week: a Swiss meringue buttercream, and a chocolate ganache.

The Swiss buttercream begins with a mixture of egg whites and sugar, whisked over a double boiler until it reaches 130 degrees F. At that point it’s transferred to the mixer, where it’s whisked for fifteen minutes until light and fluffy. (“Light and fluffy” comes up a lot in cake making.) An enormous amount of cubed softened butter is then added, slowly and rhythmically, while the icing is being flagellated with the paddle attachment for another fifteen minutes.

Cubed butter for the Swiss meringue buttercream.
The final concoction is so bright and thick it doesn't seem possible that it was made from natural ingredients. The whipped egg whites and sugar give the icing an almost unnatural sheen. There is just the slightest tinge of pale yellow from the butter. The texture is thick and viscous, like an industrial plastic. It is very, very delicious when applied to cakes.

The Swiss meringue icing before the addition of butter.
The chocolate ganache is simpler to prepare but equally delicious. Heavy cream is brought to a boil and poured over chunks of semisweet chocolate. The chocolate melts and, after some whisking, the mixture is removed to the refrigerator until it reaches spreading consistency.

Chocolate ganache. The next day I rolled this into balls and made some incredible truffles.
Preparing the icings takes a while but the tricky part is yet to come. The white butter cake from last week needs to be trimmed and cut horizontally into three layers. Icing will be applied between the layers and on the top and sides. To make a nice looking cake, the three round sections should be flat and as equal in size as possible. That’s not easy to pull off, especially when your cake is neither perfectly round nor perfectly flat to begin with.

At times like this I begin to understand the attention to detail required to be a good baker. I see that imperfections at one stage lead to challenges later on. Not that mistakes can’t be overcome, because part of being a good baker is learning to mask imperfections so they become indiscernible. It’s just that things tend to go more smoothly if care is taken at every step in the process.

The butter cake, iced with Swiss meringue buttercream, before decoration.
The genoise cake is in the background.
The class is divided into groups of two students per cake, but my partner has had to leave early so I do the cake trimming and icing on my own. I don’t imagine myself as being particularly good at this kind of thing, but somehow I pull it off with acceptable results and get kudos from Chef Sandy. The cake is not perfectly round but at least it’s flat. The icing has a smooth texture with no hint of graininess (from undissolved sugar crystals), and tastes buttery and rich. Not bad for my first time.

Impromptu "cornets," made from parchment paper. In a pinch these can be
filled with icing and used for cake decoration. They fall apart easily.
Ten minutes before the class ends, things are running late. Most people are packing up but I decide to stay and put a few rudimentary swirls and decorations on my cake. It’s amazing how even the simplest decorations improve the delectability of a cake.

The final decorated butter cake.
I don’t have time to ice the second cake (the genoise), so take it home with the ganache, which by this time has solidified to the point of not being spreadable. The next day at home I roll the ganache into one-inch balls, then dip each into either cocoa powder or chopped hazelnuts to make impromptu chocolate truffles. They are SO good.

Take home: one white butter cake with lemon buttercream icing, one plain genoise cake, chocolate ganache.